Hello there! Hope you are doing well. Have you ever tried to capture a screenshot on your gateway laptop?
If you are unsure about How To Screenshot On A Gateway Laptop then be with us. In this article I will show you 3 easy methods to capture the favorite part of your gateway laptop screen.
Whether you are a tech-savvy user or beginner after reading this blog you can easily capture the screenshot on your laptop.
How To Take A Screenshot On A Gateway Laptop?
Method 1: Using the Print Screen key
The easiest way to take a screenshot on a Gateway laptop is by using the Print Screen key.
This Key name `prtscr` or `Prtscn` on keyboard
Find the Key name `prtscr` or `Prtscn` on the keyboard located at the top right corner of the keyboard.
Here’s how to take a screenshot using the Print Screen key:
Step 1: First, Navigate to the screen of which you want to capture.
Step 2: Now Press the [ windows key + prtscn Key ] or [ Windows Key + Fn Key + prtscn Key] key on your Keyboard.
Step 3: You will see a black flash and the screenshot will be saved locally.
Step 4: You can find your screenshot at File Explorer > Pictures > Screenshots
Method 2: Using the Windows Snipping Tool
If you want to capture the specific part of the screen then you should use the Windows Snipping tool.
Here’s how to take a screenshot using the Windows snipping tool
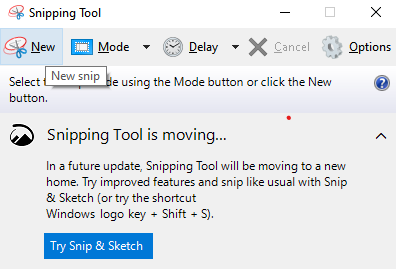
Step 1: In the Start Menu, search for the snipping tool and open it
Step 2: Now Click On New as mentioned below image
Step 3: Use your cursor and drag the are of the screen you want to capture
Step 4: Save the screenshot to your preferred location by clicking Save
Method 3: Using Keyboard Shortcuts
Another way to save the screen of your gateway laptop screen is using Keyboard shortcut.
Depending on your version of Windows, these shortcuts might work differently, but you can try those below and see what works for you.
- Windows Key + Prtscn: It will capture the entire screen and save at at File Explorer > Pictures > Screenshots
- Windows Key + Prtscn + S: It will open a snipping tool and you can capture your favorite part of the screen.
- Fn + Prtscn: It will also open the same snipping tool
Conclusion
The process of taking a screenshot on a Gateway laptop is easy and can be completed in a few steps. Print Screen allows you to quickly capture the entire screen, while Snipping Tool gives you more control over your screenshots. Another option for taking screenshots on a Gateway laptop is to use keyboard shortcuts.
I hope it helps you to take your first screenshot. See you Again!!